Windows上で,YOLOv8をインストールし,物体検出,セグメンテーション,画像分類の実行が可能である.インストールは公式のGitHubページの説明に従って行い,コマンドプロンプトで操作する.YOLOv8 に付属の物体検出の学習済みモデルは,COCOデータセットで学習され,yolov8n.ptなどから選ぶことができる.再学習のために必要となる画像データとアノテーションは,YOLO形式のオープンデータを用いることができる.そのとき,クラス番号を 80 やそれより大きい値に振り直す.そのためのPythonプログラムはこのページで提供している.再学習では,オプションを指定して実行する.

【目次】
Gitは,バージョン管理システム.ソースコードの管理や複数人での共同に役立つ.
【サイト内の関連ページ】
Windows での Git のインストール: 別ページ »で説明している.
【関連する外部ページ】
Git の公式ページ: https://git-scm.com/
【サイト内の関連ページ】
【関連する外部ページ】
Python の公式ページ: https://www.python.org/
【サイト内の関連ページ】
NVIDIA グラフィックスボードを搭載しているパソコンの場合には, NVIDIA ドライバ, NVIDIA CUDA ツールキット, NVIDIA cuDNN のインストールを行う.
【関連する外部ページ】
コマンドプロンプトを管理者として実行: 別ページ »で説明
PyTorch のページ: https://pytorch.org/index.html
次のコマンドを実行することにより, PyTorch 2.3 (NVIDIA CUDA 11.8 用)がインストールされる. 但し,Anaconda3を使いたい場合には別手順になる.
事前に NVIDIA CUDA のバージョンを確認しておくこと(ここでは,NVIDIA CUDA ツールキット 11.8 が前もってインストール済みであるとする).
PyTorch で,GPU が動作している場合には,「torch.cuda.is_available()」により,True が表示される.
python -m pip install -U --ignore-installed pip
python -m pip uninstall -y torch torchvision torchaudio
python -m pip install -U torch torchvision torchaudio numpy --index-url https://download.pytorch.org/whl/cu118
python -c "import torch; print(torch.__version__, torch.cuda.is_available())"
![[image]](../../tools/man/529.png)
Anaconda3を使いたい場合には, Anaconda プロンプト (Anaconda Prompt) を管理者として実行し, 次のコマンドを実行する. (PyTorch と NVIDIA CUDA との連携がうまくいかない可能性があるため,Anaconda3を使わないことも検討して欲しい).
conda install -y pytorch torchvision torchaudio pytorch-cuda=11.8 cudnn -c pytorch -c nvidia
py -c "import torch; print(torch.__version__, torch.cuda.is_available())"
【サイト内の関連ページ】
【関連する外部ページ】
YOLOv8 の公式の GitHub のページ https://github.com/ultralytics/ultralytics に従ってインストールする.
コマンドプロンプトを管理者として実行: 別ページ »で説明
python -m pip install -U pillow wandb clearml comet_ml
cd %HOMEPATH%
rmdir /s /q ultralytics
git clone -b main https://github.com/ultralytics/ultralytics
python -m pip install -qe ultralytics
icacls ultralytics /grant Everyone:F /T
YOLOv8 の公式の GitHub のページ https://github.com/ultralytics/ultralytics に従う.
runs\detect\predict\bus.jpg の「predict」は実行のたびにpredict2, predict3 のように変えてください.
物体検出の学習済みモデルは, yolov8n.pt, yolov8s.pt, yolov8m.pt, yolov8l.pt, yolov8x.pt から選択できる.これらの学習済みモデルは,いずれもCOCO データセットで学習済みのモデルである。詳しくは公式ページの https://github.com/ultralytics/ultralytics/blob/main/ultralytics/cfg/datasets/coco.yaml
yolov8n.ptを使う場合
cd %HOMEPATH%\ultralytics
rmdir /s /q runs\detect\predict
yolo predict model=yolov8n.pt source='https://ultralytics.com/images/bus.jpg' exist_ok=True
runs\detect\predict\bus.jpg
![[image]](380.png)
![[image]](381.png)
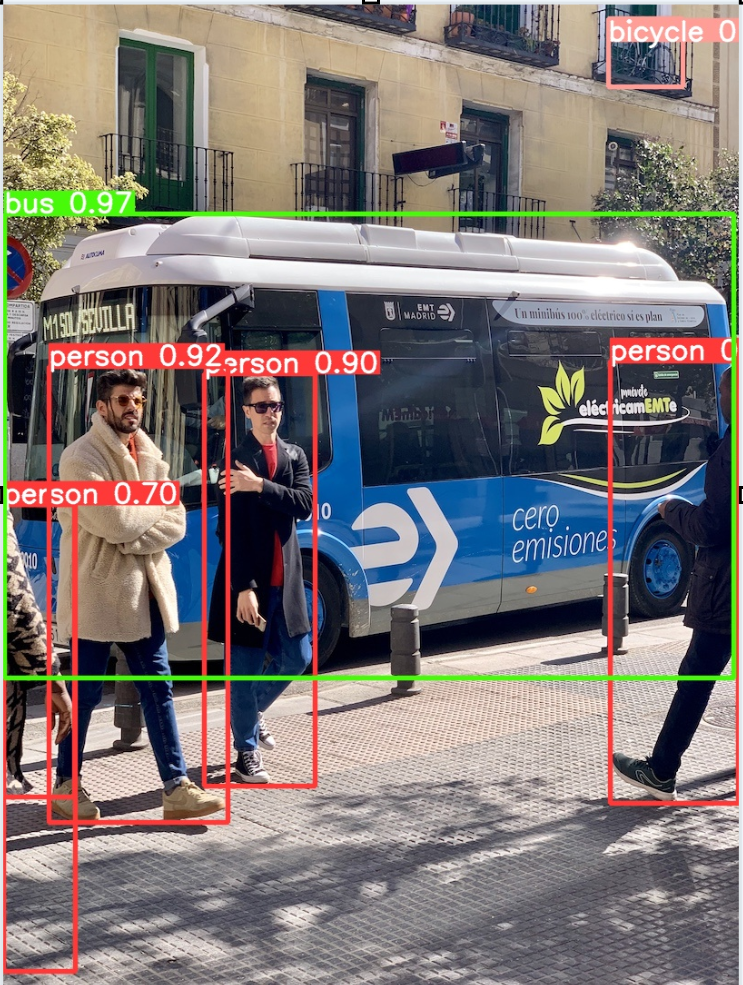
yolov8x.ptを使う場合
cd %HOMEPATH%\ultralytics
rmdir /s /q runs\detect\predict
yolo predict model=yolov8x.pt source='https://ultralytics.com/images/bus.jpg' exist_ok=True
runs\detect\predict\bus.jpg
![[image]](723.png)
公式ページの https://docs.ultralytics.com/tasks/segment/に従う.
yolov8n-seg.ptを使う場合
cd %HOMEPATH%\ultralytics
rmdir /s /q runs\segment\predict
yolo segment predict model=yolov8n-seg.pt source='https://ultralytics.com/images/bus.jpg' exist_ok=True
runs\segment\predict\bus.jpg
![[image]](383.png)
![[image]](384.png)
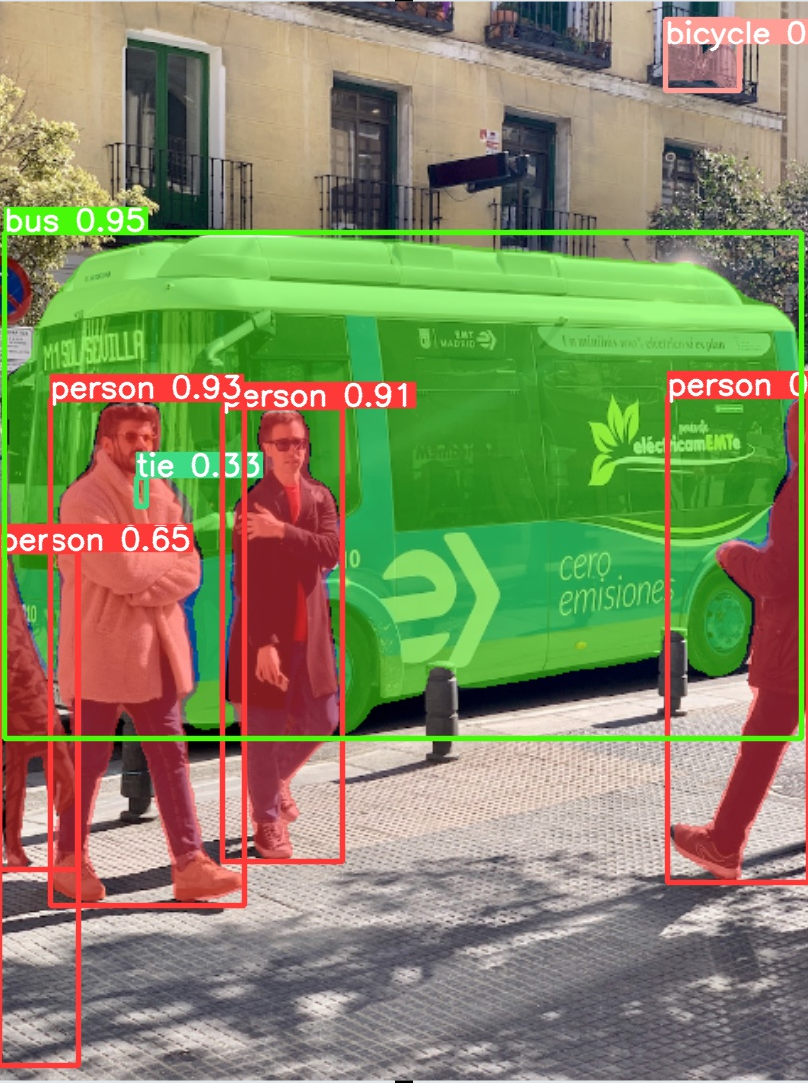
yolov8x-seg.ptを使う場合
cd %HOMEPATH%\ultralytics
rmdir /s /q runs\segment\predict
yolo segment predict model=yolov8x-seg.pt source='https://ultralytics.com/images/bus.jpg' exist_ok=True
runs\segment\predict\bus.jpg
![[image]](725.png)
公式ページの https://docs.ultralytics.com/tasks/classify/に従う.
yolov8n-cls.ptを使う場合
cd %HOMEPATH%\ultralytics
rmdir /s /q runs\classify\predict
yolo classify predict model=yolov8n-cls.pt source='https://ultralytics.com/images/bus.jpg' exist_ok=True
runs\classify\predict\bus.jpg
![[image]](386.png)
![[image]](385.png)
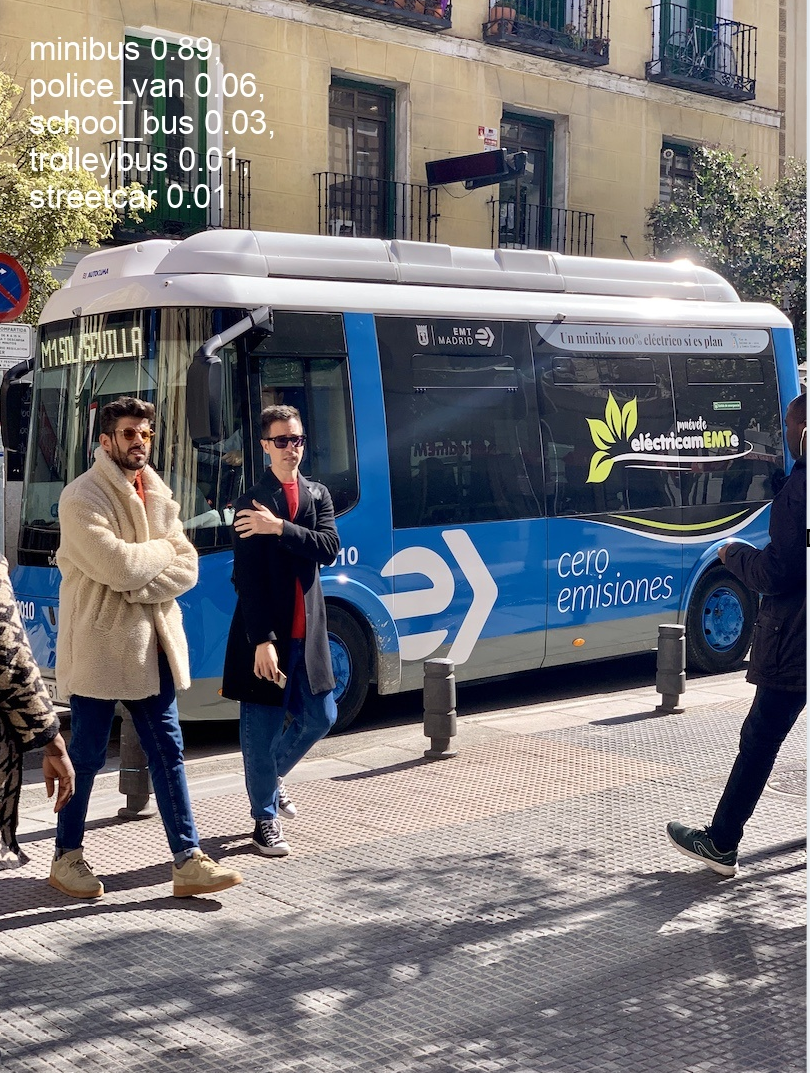
yolov8x-cls.ptを使う場合
cd %HOMEPATH%\ultralytics
rmdir /s /q runs\classify\predict
yolo classify predict model=yolov8x-cls.pt source='https://ultralytics.com/images/bus.jpg' exist_ok=True
runs\classify\predict\bus.jpg
![[image]](727.png)
「source='https://media.roboflow.com/notebooks/examples/dog.jpeg'」のところは,ファイル名やURLを指定.
物体検出の学習済みモデルは, yolov8n.pt, yolov8s.pt, yolov8m.pt, yolov8l.pt, yolov8x.pt から選択できる.物体学習済みモデルは,いずれもCOCO データセットで学習済みのモデルである。詳しくは公式ページの https://github.com/ultralytics/ultralytics/blob/main/ultralytics/cfg/datasets/coco.yaml
yolov8x.ptを使う場合
cd %HOMEPATH%\ultralytics
rmdir /s /q runs\detect\predict
yolo task=detect mode=predict model=yolov8x.pt conf=0.25 source='https://media.roboflow.com/notebooks/examples/dog.jpeg' save=True save_txt=True exist_ok=True
runs\detect\predict\dog.jpeg
![[image]](387.png)
![[image]](397.png)
1列目はクラス番号.2列目から5列目はバウンディングボックスのデータである.
![[image]](390.png)
Python プログラムの実行
Python 開発環境(Jupyter Qt Console, Jupyter ノートブック (Jupyter Notebook), Jupyter Lab, Nteract, Spyder, PyCharm, PyScripterなど)も便利である.
Python のまとめ: 別ページ »にまとめ
python
yolov8x は COCO データセットで学習済みのモデルである。物体検出の学習済みモデルは, yolov8n.pt, yolov8s.pt, yolov8m.pt, yolov8l.pt, yolov8x.pt から選択できる.物体学習済みモデルは,いずれもCOCO データセットで学習済みのモデルである。詳しくは公式ページの https://github.com/ultralytics/ultralytics/blob/main/ultralytics/cfg/datasets/coco.yaml
from ultralytics import YOLO
model = YOLO("yolov8x.pt")  # load a pretrained model (recommended for training)
results = model.predict(source='https://media.roboflow.com/notebooks/examples/dog.jpeg', conf=0.25)
for i in results:
    print(i.boxes.xyxy)
    print(i.boxes.cls)

exit()
![[image]](391.png)
【再学習】
再学習(Fine-tuning)は、事前に大量のデータで学習済みのモデル(事前学習済みモデル)を利用する手法である。オブジェクト検出において、再学習を行うことで、事前学習の際に使用しなかった新しいクラス(物体のカテゴリ)の検出が可能になる。事前学習済みモデルは、すでに特徴抽出能力を備えているため、これを利用することで、比較的少量のデータで効率的に新しいタスクを学習できるとされている。再学習の過程では、事前学習済みモデルの重みとバイアスが利用される。これらの値を新しいタスクのデータで調整することで、モデルは新しいタスクを行う能力を得る。事前学習済みモデルの重みとバイアスを利用することで、ランダムな初期値から学習を始めるよりも効率的に学習できるとされている。
【転移学習】
転移学習(Transfer Learning)は、事前学習済みモデルを活用する機械学習の手法の一つである。転移学習では、事前学習済みモデルの最終層以外の層の重みとバイアスを固定し、最終層のみを新しいタスクに合わせて再学習(Fine-tuning)する。最終層以外の層の重みとバイアスを固定することで、学習の際に調整が必要なパラメータ数が大幅に減少する。これにより、以下のようなメリットが期待できる。
画像データと物体検出のためのアノテーションデータとして,クラス名とバウンディングボックスのデータを使用する. この目的のために,YOLO形式のオープンデータであるTraffic Signs Datasetを使用する.
Traffic Signs Dataset をダウンロードし,次の処理の上で,学習を行う
Traffic Signs Dataset は,0, 1, 2, 3 を使うようにしても問題なく学習できるが, COCOデータセットとの混同をさけたいため,80, 81, 82, 83 を使うようにする.
   ├── images/
      ├─train/
      └─val/
   ├── labels/
      ├─train/
      └─val/
![[image]](402.png)
![[image]](403.png)
次のようにする.
![[image]](392.png)
cd C:\archive\ts
python
![[image]](729.png)
このプログラムは,"ts/ts/"ディレクトリ内の900個のテキストファイル("00000.txt"から"00899.txt")を処理する。 各ファイルのすべての行の最初の列からクラス番号(0, 1, 2, 3)を取り出し,その値が80未満の場合,80を加算してファイルに書き戻す。 ファイルが存在しない場合,エラーメッセージが表示される.
def update_class_number(filename):
    with open(filename, "r", encoding="utf-8") as file:
        lines = file.readlines()
    updated_lines = []
    for line in lines:
        parts = line.strip().split()
        if len(parts) >= 5:
            class_number = int(parts[0])
            # もともとのクラス番号 (class_number) は 0, 1, 2, 3 である。80を加えて,元のファイルのクラス番号を更新する
            if class_number < 80:
                updated_class_number = class_number + 80
                x1, y1, x2, y2 = map(float, parts[1:])
                updated_line = f"{updated_class_number} {x1} {y1} {x2} {y2}\n"
                updated_lines.append(updated_line)
            else:
                updated_lines.append(line)
        else:
            updated_lines.append(line)
    with open(filename, "w", encoding="utf-8") as file:
        file.writelines(updated_lines)

file_not_found = False
for i in range(0, 900):
    # 00000.txt から 00899.txt まで
    filename = f"ts/{i:05}.txt"
    try:
        update_class_number(filename)
        # 確認表示
        with open(filename, "r", encoding="utf-8") as file:
            first_line = file.readline().strip()
            print(f"filename: {filename} , {first_line}")
    except FileNotFoundError:
        print(f"{filename} が見つかりませんでした")
        file_not_found = True

exit()
![[image]](730.png)
このプログラムの実行により,クラス番号 80, 81, 82, 83 を使用することになる.
なお,それぞれのクラス番号のクラス名は,ファイル c:\archive\classes.names にある通り,次のようになる.
80, prohibitory
81, danger
82, mandatory
83, other
まず,次のコマンドを実行
cd c:\archive\ts\ts
python
![[image]](731.png)
次のPythonプログラムを実行
from PIL import Image
import os

# 新しい幅
new_width = 640

# カレントディレクトリ内のすべてのファイル
for filename in os.listdir('.'):
    # .jpgファイルのみを処理
    if filename.endswith('.jpg'):
        print(f"{filename} を変換")
        with Image.open(filename) as img:
            # アスペクト比を保持した高さを計算
            aspect_ratio = new_width / img.width
            new_height = int(img.height * aspect_ratio)
            # リサイズ
            resized_img = img.resize((new_width, new_height))
            # 元のファイルを上書き
            resized_img.save(filename)

exit()
![[image]](732.png)
mkdir c:\archive\ts\ts\images
mkdir c:\archive\ts\ts\images\train
mkdir c:\archive\ts\ts\images\val
mkdir c:\archive\ts\ts\labels
mkdir c:\archive\ts\ts\labels\train
mkdir c:\archive\ts\ts\labels\val
cd c:\archive\ts\ts
move *1.txt labels\val
move *1.jpg images\val
move *.txt labels\train
move *.jpg images\train
icacls c:\archive\ts /grant Everyone:F /T
エディタを起動
cd %HOMEPATH%
cd ultralytics
notepad ts.yaml
![[image]](734.png)
エディタで次のように作成し保存する.
names は 84 個の文字列のリストである.最初の 80 個は COCO データセットのクラス名.残りの 4 個は,いまから学習を行うデータセットのクラス名になる.
path: c:/archive/ts/ts
train: images/train
val: images/val
nc: 84
names:
  0: person
  1: bicycle
  2: car
  3: motorcycle
  4: airplane
  5: bus
  6: train
  7: truck
  8: boat
  9: traffic light
  10: fire hydrant
  11: stop sign
  12: parking meter
  13: bench
  14: bird
  15: cat
  16: dog
  17: horse
  18: sheep
  19: cow
  20: elephant
  21: bear
  22: zebra
  23: giraffe
  24: backpack
  25: umbrella
  26: handbag
  27: tie
  28: suitcase
  29: frisbee
  30: skis
  31: snowboard
  32: sports ball
  33: kite
  34: baseball bat
  35: baseball glove
  36: skateboard
  37: surfboard
  38: tennis racket
  39: bottle
  40: wine glass
  41: cup
  42: fork
  43: knife
  44: spoon
  45: bowl
  46: banana
  47: apple
  48: sandwich
  49: orange
  50: broccoli
  51: carrot
  52: hot dog
  53: pizza
  54: donut
  55: cake
  56: chair
  57: couch
  58: potted plant
  59: bed
  60: dining table
  61: toilet
  62: tv
  63: laptop
  64: mouse
  65: remote
  66: keyboard
  67: cell phone
  68: microwave
  69: oven
  70: toaster
  71: sink
  72: refrigerator
  73: book
  74: clock
  75: vase
  76: scissors
  77: teddy bear
  78: hair drier
  79: toothbrush
  80: prohibitory
  81: danger
  82: mandatory
  83: other
![[image]](436.png)
コマンドプロンプトを管理者として実行: 別ページ »で説明
GPU を使うときは,次のように実行する.
実行にかかる時間の目安は10分から数十分である.
cd %HOMEPATH%
cd ultralytics
yolo task=detect mode=train data=ts.yaml model=yolov8x.pt epochs=30 imgsz=640 verbose=True exist_ok=True rect=True
![[image]](735.png)
実行後,「pretrained=True」と表示されるので,yolov8x.pt の学習結果が利用されていることが確認できる.
このとき,次のように「Enter your choice」と表示された場合は 3, Enter と操作する.
![[image]](736.png)
なお,GPU を使わないときは,次のように「device=cpu」を付ける.このときは,実行に10時間ほどかかる.
cd %HOMEPATH%
cd ultralytics
yolo task=detect mode=train data=ts.yaml model=yolov8x.pt epochs=30 imgsz=640 verbose=True exist_ok=True rect=True device=cpu
このとき,結果が保存されているディレクトリを確認する. 最後のところに「Results saved to runs\detect\...」のように表示されるので確認
![[image]](739.png)
dir コマンドでファイルを結果を確認.
dir runs\detect\train
dir runs\detect\train\weights
![[image]](441.png)
「runs/detect/train」のところには,先ほど確認した「結果が保存されているディレクトリ」である.
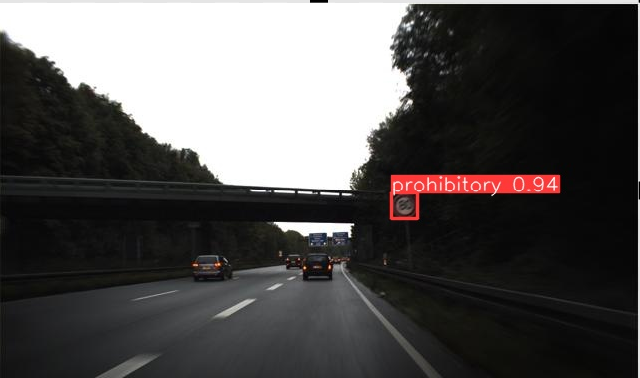
yolo predict model=./runs/detect/train/weights/best.pt source='c:/archive/ts/ts/images/val/00001.jpg' save=True save_txt=True show=True exist_ok=True
runs\detect\predict\00001.jpg
![[image]](443.png)
学習時に「freeze=22」の設定をつけることで,転移学習を行うことができる.
コマンドプロンプトを管理者として実行: 別ページ »で説明
GPU を使うときは,次のように実行する.
実行にかかる時間の目安は10分から数十分である.
cd %HOMEPATH%
cd ultralytics
yolo task=detect mode=train data=ts.yaml model=yolov8x.pt epochs=30 imgsz=640 verbose=True exist_ok=True rect=True freeze=22
実行後,「pretrained=True」と表示されるので,yolov8x.pt の学習結果が利用されていることが確認できる.
![[image]](740.png)
このとき,次のように「Enter your choice」と表示された場合は 3, Enter と操作する.
なお,GPU を使わないときは,次のように「device=cpu」を付ける.このときは,実行に10時間ほどかかる.
cd %HOMEPATH%
cd ultralytics
yolo task=detect mode=train data=ts.yaml model=yolov8x.pt epochs=30 imgsz=640 verbose=True exist_ok=True rect=True device=cpu freeze=22
このとき,結果が保存されているディレクトリを確認する. 最後のところに「Results saved to runs\detect\...」のように表示されるので確認
![[image]](741.png)
dir コマンドでファイルを結果を確認.
dir runs\detect\train
dir runs\detect\train\weights
![[image]](743.png)
「runs/detect/train」のところには,先ほど確認した「結果が保存されているディレクトリ」である.
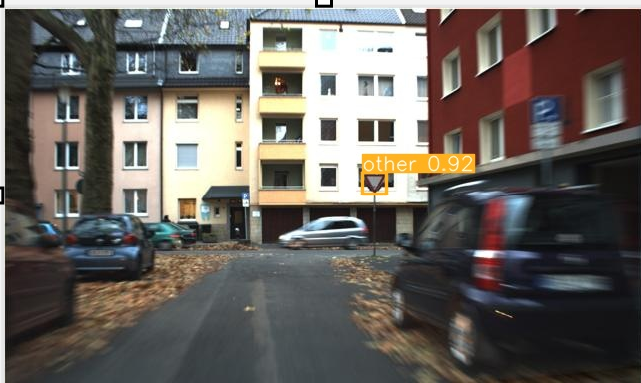
yolo predict model=./runs/detect/train/weights/best.pt source='c:/archive/ts/ts/images/val/00001.jpg' save=True save_txt=True show=True exist_ok=True
runs\detect\predict\00001.jpg
![[image]](744.png)
![[image]](745.png)
本サイトは金子邦彦研究室のWebページである.
資料等の公開では,原則,「クリエイティブコモンズ BY NC SA」として公開するようにしている. PDFファイル,パワーポイントファイルなどには, 「クリエイティブコモンズ BY NC SA」を明記するとともに,ロゴを記載するようにしている(作業が間に合っていない分もあるのでご容赦ください).
公開している資料をご利用になる場合の,再配布の条件,剽窃の防止などについて,別ページ »で説明 再配布や資料改変の際には,そのページをご確認ください.
サイトマップは,サイトマップのページをご覧下さい. 本サイト内の検索は,サイト内検索のページをご利用下さい.
問い合わせ先: 金子邦彦(かねこ くにひこ) ![[image]](https://www.kkaneko.jp/info/kanekomail.png)